Baby G had her 1st birthday and Mama G. asked me to make cupcakes for Baby G. Her request: Any cupcake is good, as long as it is tasty. She just wants a Hello Kitty themed cupcakes. Hah. No Problem..
So I started searching for recipe. I knew this cupcake will end up very sweet. I anticipated lots of fondant for the hello kitty, so I wanted something with a simple taste.. Nothing too complex in terms of texture. But I did not want just plain Vanilla cupcake. I searched the web and found
Cupcake Project's Vanilla Malt Cupcake. It was perfect, a simple texture yet something different from your normal type of cupcake.
For the recipe:
Makes 16:
¾ cup sugar
½ cup malted milk powder (I used Ovaltine)
1 ¾ cups cake flour, not self-rising
1 ½ teaspoons baking powder
½ teaspoon baking soda
½ teaspoon salt
½ cup unsalted butter, room temperature
1 tablespoon vanilla extract
2 large eggs, room temperature
¾ cup whole milk
Instructions:
- Preheat Oven to 180 degree C. and line your cupcake tray with liners.
- In a bowl, mixed in the flour, baking powder, soda, salt and malt powder. Set Aside.
- Using your stand alone mixer (with paddler attachment) or handheld mixer, beat the butter and sugar until fluffy and light. Add in the vanilla extract.
- Add in the eggs into the butter mixture and mixed till smooth
- To the mixture, slowly add in the dry ingredients and milk. (I used half flour --> half milk, continue until all in mixed) Ensure you do not over mix your batter, else you will have a hard bread like texture.
- Bake the cupcake for 20 minutes or till your toothpick comes out clean when you insert it in the middle.
For the frosting, I decided to go all Vanilla as well. I decided to use Vanilla paste frosting. I thought it will turn out too sweet but surprisingly the taste is something that even for a person like me who do not like anything sweet to actually say it was okay. Amazing. Again, I adapted the recipe from
Cupcake Project's Vanilla Bean Buttercream Frosting Recipe. Wells, some recipe calls to use the actual bean but I prefer to use paste.
For the recipe:
Enough for 12 cupcakes
1 1/2 cup icing sugar, sifted (add more until it reaches your preferred consistency)
1/2 cup unsalted butter, room temperature
2 teaspoons vanilla bean paste (add more to taste)
1 tablespoon of milk (I did not add it on my recipe - Singapore weather too hot. Milk will turn bad plus frosting melts more readily with our temperature)
Steps:
- In your standalone mixer or handheld electric mixer, beat the butter until light and fluffy
- Add in the vanilla bean paste and until well mixed. Mix for a minute or so.
- Add the sifted icing sugar 1/2 a cup at a time. Be careful the mixer is at low speed
- You may want to add milk if you find the consistency too thick.
Note: I used SCS butter, not because they paid me to say so but because I realise that other butter that is sold in Singapore tends to melt faster than SCS and given our weather they melting process is accelerated exponentially.
My masterpiece.. I think it looks like clouds.. So fluffy and light. Smells delicious too..
 |
| Vanilla Malt Cupcakes with Vanilla Bean Buttercream frosting. So Yummy~~~ |
 |
| Clouds in my kitchen |
How course, the first batch was just to test water. Could not wait till the actual baking day to try a new recipe. So of course I used the first batch to try ways to include a Hello Kitty theme to my cupcakes. First thought was to make a Hello Kitty fondant something like this:
But I did not have black & yellow colouring so I improvised and it became this:
 |
| Fusion Pink Hello Kitty. |
Mama G saw this and say too fusion pink! Haha. I also say.. So weird right. Complete Failure. Plus the fondant melted after 24 hours. It just looked horrible and it was too sweet. The fondant is OMG sweet to the max. This is not the standard Drama Mama B. has. NG!
Was about to give up doing something hello kitty and resorting to just using paper cupcake toppers that Mama G. bought:
But CANNOT! 过不了自己那一关. Ha. Meaning I cannot let myself go for such sub-standard cupcakes.
So I decided to bake cookies - Hello Kitty Cookies. At least there is some Hello Kitty stuff that I can proudly say I made by hand. I must be crazy, but I think I baked like 70 of them.
 |
| Hello Kitty Sugar Cookies |
I will have another blog on my Hello Kitty Cookies. Please stay tune for that :) The flooding of the royal icing nearly killed me to the max.
Final Product
 |
| Cupcake with Hello Kitty Cookie on top. I coloured the frosting pink. The whole theme was pink. |
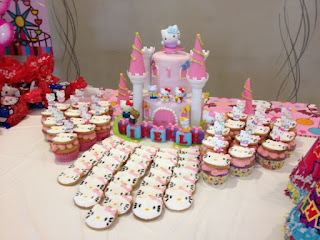 |
| The end product with the hello kitty 2-tiered cake that Mama G. ordered. |
Happy Birthday Baby G!


