Showing posts with label Birthdays. Show all posts

Thursday, April 24, 2014

Extra Dark Chocolate Cake with Salted Extra Dark Chocolate Frosting

Was messaging friend D during the long Easter weekend of what I had been baking and she told me that her birthday was coming.. In a couple of days actually.. So i told her, let me bake you a cake then.. That got me thinking what cake should I bake.. It has been so long since I baked a full cake.. Think the last round it was in January 2013 when I first started the blog.. hahaha. it was that long.. New work and everything just took me away from my beloved baking.. It was really awesome to continue baking.. I felt so happy to bake. Felt so nice during the long weekend.. Baked so many stuff (recipe coming soon)

Long story short.. I decided to bake chocolate cake.. Went to Phoon Huat and saw this "Extra Dark Cocoa Powder" and I was like.. Wow... How dark is extra dark.. bought a pack back and oh my.. it was like the charcoal powder.. No kidding..
SO So Black :) I like 

Ingredients (makes a good 8-12 slices, depending on how big or small you want to slice the cake. but 12 is still too big for me.. haha) Adapted from Joy Of Baking's Simple Chocolate Cake

For the Cake
  • 425g of Sugar
  • 245g of Plain Flour
  • 75g of Extra Dark Cocoa powder
  • 1 1/2 teaspoon of baking powder
  • 1 1/2 teaspoon of baking soda
  • 1/2 teaspoon of salt
  • 1/2 Cup of Flavourless Oil (I use Canola Oil)
  • 1 Cup Milk
  • 2 Large Eggs
  • 1 1/2 Pure Vanilla Extract
  • 1 Cup Warm Strong Espresso 
For the Frosting
  • 226g of unsalted butter
  • 3 to 3 1/4 Cups  of icing sugar
  • 1 teaspoon of vanilla extract
  • 50g of Extra Dark Cocoa powder
  • 3/4 teaspoon of salt
  • 2 to 3 tablespoon of Milk

Method:
For the Cake: 

  1. Preheat Oven to 180C. Set aside 2 9" by  1.5" round pan with parchment paper and oiled. 
  2. Add all the dry ingredients (first 6 items) together in a large mixing bowl. Mix well.
  3. Combine all the wet ingredients together. Whisk well 
  4. Add the Wet Ingredients to the dry ingredients until combined. 
  5. Bake the cake batter for 27 - 30min or until a toothpick comes out clean when poked into the middle of the cake. Remove from oven and let it cool in the pan for 10 - 15min and the top side down on a wire rack 
Note: Instead of using butter for most recipe, it is good to use oil. Oil will not dried up like butter will and even when refrigerated will not hardened.. Which gives you a moist and soft cake to eat.. *Yum Yum*

For the Frosting: 
  1. Sift the icing sugar and cocoa powder separately
  2. In a stand alone mixer, using the paddler attachment, stir the butter till it is pale and creamy looking. Add in the vanilla extract and salt. Continue to mix until combine.
  3. Add in the sifted cocoa powder. Mix well.
  4. Slowly add the icing sugar 1/4 cup at a time. Halfway through adding in the sugar, pour in 1 Tablespoon of milk. This will help to mix the icing sugar better with a bit of liquid. Keep alternating the addition of the icing sugar and milk till you get the right consistency and the sweetness level. 
Note: Another reason I alternate adding icing sugar and milk is because I worried if the frosting is too sweet. (Not much of a sweet tooth for me.) 


To assemble the cake.. 
I made it more rugged looking.. Not bad eh. 
  • You might want to cut flat the cake (sometimes the cake baked with a little bulge). What I did earlier, which is to put the top side diwn is to try to flatten the bulge as much as possible. 
  • Putting the flatter side of the cake at the bottom of your cake stand, spread a layer of the frosting on top of the cake. The amount really depended on how thick you want your frosting to be. 
  • Next, place the next layer with the less flatter cake touching the frosting. (This way, I created a flat top that you see in all cakes at the cake shop. You might see some gaps between the 2 layers of cake, no worries, you can fill them up with more frosting. *Yum Yum*)
  • Crumb coat the whole cake. Crumb coat means applying a thin layer of your frosting and then refrigerate the whole cake for a good 10 min. This will help in providing a crumb free surface to work with while you frost the cake. Once you frost the cake to the level of perfection, you can leave it as it is (which is what I did for the cake) or add decoratives items to beautify the cake :)

Friend D was very surprised that I made her a cake. She was just kidding. But wells, I told her I was doing.. And am happy to be baking for her.. Made me wanna bake more cake for more people and for any occasion..
With candle and "Happy Birthday" decorative item.


Peeps! Give me more reasons to bake.. I really love to see people enjoying my cake :)

Friday, October 5, 2012

Vanilla Malt Cupcakes + Hello Kitty Overload Birthday Celebration

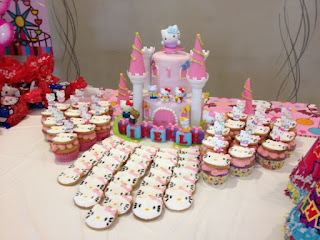
Baby G had her 1st birthday and Mama G. asked me to make cupcakes for Baby G. Her request: Any cupcake is good, as long as it is tasty. She just wants a Hello Kitty themed cupcakes. Hah. No Problem..

So I started searching for recipe. I knew this cupcake will end up very sweet. I anticipated lots of fondant for the hello kitty, so I wanted something with a simple taste.. Nothing too complex in terms of texture. But I did not want just plain Vanilla cupcake. I searched the web and found Cupcake Project's Vanilla Malt Cupcake. It was perfect, a simple texture yet something different from your normal type of cupcake.


For the recipe:
Makes 16:

¾ cup sugar
½ cup malted milk powder (I used Ovaltine)
1 ¾ cups cake flour, not self-rising
1 ½ teaspoons baking powder
½ teaspoon baking soda
½ teaspoon salt
½ cup unsalted butter, room temperature
1 tablespoon vanilla extract
2 large eggs, room temperature
¾ cup whole milk

Instructions:

  1. Preheat Oven to 180 degree C. and line your cupcake tray with liners. 
  2. In a bowl, mixed in the flour, baking powder, soda, salt and malt powder. Set Aside. 
  3. Using your stand alone mixer (with paddler attachment) or handheld mixer, beat the butter and sugar until fluffy and light. Add in the vanilla extract.
  4. Add in the eggs into the butter mixture and mixed till smooth 
  5. To the mixture, slowly add in the dry ingredients and milk. (I used half flour --> half milk, continue until all in mixed) Ensure you do not over mix your batter, else you will have a hard bread like texture. 
  6. Bake the cupcake for 20 minutes or till your toothpick comes out clean when you insert it in the middle. 


For the frosting, I decided to go all Vanilla as well. I decided to use Vanilla paste frosting. I thought it will turn out too sweet but surprisingly the taste is something that even for a person like me who do not like anything sweet to actually say it was okay. Amazing. Again, I adapted the recipe from Cupcake Project's Vanilla Bean Buttercream Frosting Recipe. Wells, some recipe calls to use the actual bean but I prefer to use paste. 

For the recipe: 
Enough for 12 cupcakes

1 1/2 cup icing sugar, sifted (add more until it reaches your preferred consistency)
1/2 cup unsalted butter, room temperature
2 teaspoons vanilla bean paste (add more to taste)
1 tablespoon of milk (I did not add it on my recipe - Singapore weather too hot. Milk will turn bad plus frosting melts more readily with our temperature)

Steps: 
  1. In your standalone mixer or handheld electric mixer, beat the butter until light and fluffy
  2. Add in the vanilla bean paste and until well mixed. Mix for a minute or so. 
  3. Add the sifted icing sugar 1/2 a cup at a time. Be careful the mixer is at low speed
  4. You may want to add milk if you find the consistency too thick. 
Note: I used SCS butter, not because they paid me to say so but because I realise that other butter that is sold in Singapore tends to melt faster than SCS and given our weather they melting process is accelerated exponentially. 

My masterpiece.. I think it looks like clouds.. So fluffy and light. Smells delicious too.. 
Vanilla Malt Cupcakes with Vanilla Bean Buttercream frosting. So Yummy~~~

Clouds in my kitchen 


How course, the first batch was just to test water. Could not wait till the actual baking day to try a new recipe. So of course I used the first batch to try ways to include a Hello Kitty theme to my cupcakes. First thought was to make a Hello Kitty fondant something like this:

Picture from Solid Recipe

But I did not have black & yellow colouring so I improvised and it became this:

Fusion Pink Hello Kitty. 
Mama G saw this and say too fusion pink! Haha. I also say.. So weird right. Complete Failure. Plus the fondant melted after 24 hours. It just looked horrible and it was too sweet. The fondant is OMG sweet to the max. This is not the standard Drama Mama B. has. NG!

Was about to give up doing something hello kitty and resorting to just using paper cupcake toppers that Mama G. bought:


But CANNOT! 过不了自己那一关. Ha. Meaning I cannot let myself go for such sub-standard cupcakes. 

So I decided to bake cookies - Hello Kitty Cookies. At least there is some Hello Kitty stuff that I can proudly say I made by hand.  I must be crazy, but I think I baked like 70 of them. 

Hello Kitty Sugar Cookies

I will have another blog on my Hello Kitty Cookies. Please stay tune for that :) The flooding of the royal icing nearly killed me to the max. 

Final Product

Cupcake with Hello Kitty Cookie on top. I coloured the frosting pink. The whole theme was pink. 

The end product with the hello kitty 2-tiered cake that Mama G. ordered. 


Happy Birthday Baby G!