Showing posts with label bread. Show all posts

Tuesday, April 1, 2014

Banana Bread.. Version 2.0 .. My quest to healthy yet tasty bread

Since Kimmie asked me to make Banana Bread, I decided to make one from the previous recipe and another one with an improved recipe.


This time, i decided to change plain flour to oatmeal flour and reduced the amount of sugar by 25%

Let's now talk about Version 2.0

Ingredients (Makes 1 loaf)
  • 1 3/4 Cup of Oatmeal Flour (Take around 2 Cups Oatmeal and grind)
  • 1 tsp of baking soda
  • 1 tsp of baking powder
  • 1/2 tsp of salt
  • 1/2 tsp of Cinnamon Powder
  • 1/2 Cup of low-fat yoghurt (thinking of trying greek yoghurt the next round)
  • 3/4 Cup of sugar (thinking of lowing the sugar amount the next round)
  • 2 large eggs
  • 5 medium sized ripe bananas, mashed ("kim-jio" for those living in Singapore)
  • 1 tsp of vanilla extract
  • Zest of 1 orange (medium size)
Directions
  1. Preheat oven to 180C. Set aside a 9" by 5" loaf pan with parchment paper and greased with butter or non-stick spray. 
  2. Take the oat (rolled or quick) and grind it for a couple of mins. It is okay if it is not finely grinded.  
  3. Mix the 1st 5 dry ingredients together and set aside. 
  4. Add the orange zest into the mashed banana and mixed well.
  5. In a mixing bowl cream the sugar and the yoghurt together for a couple of minutes. Add egg and continue mixing till well combined. 
  6. Add in the banana-orange zest into the mixing bowl. Mix them till well combined. 
  7. Lastly, add in the dry ingredients and stop mixing once 90% of the dry ingredients are combined. Using a spatula, fold to ensure all the dry ingredients are well mixed. This is to prevent over-mixing and the formation of gluten in the flour. If so, the bread will be tough. 
  8. Pour the batter into the loaf pan and bake for 35-40 min or until when you insert a toothpick into the middle of the loaf and the toothpick comes out clean. 
Apparently it is faster to bake banana bread made from oatmeal flour.. Wells. 

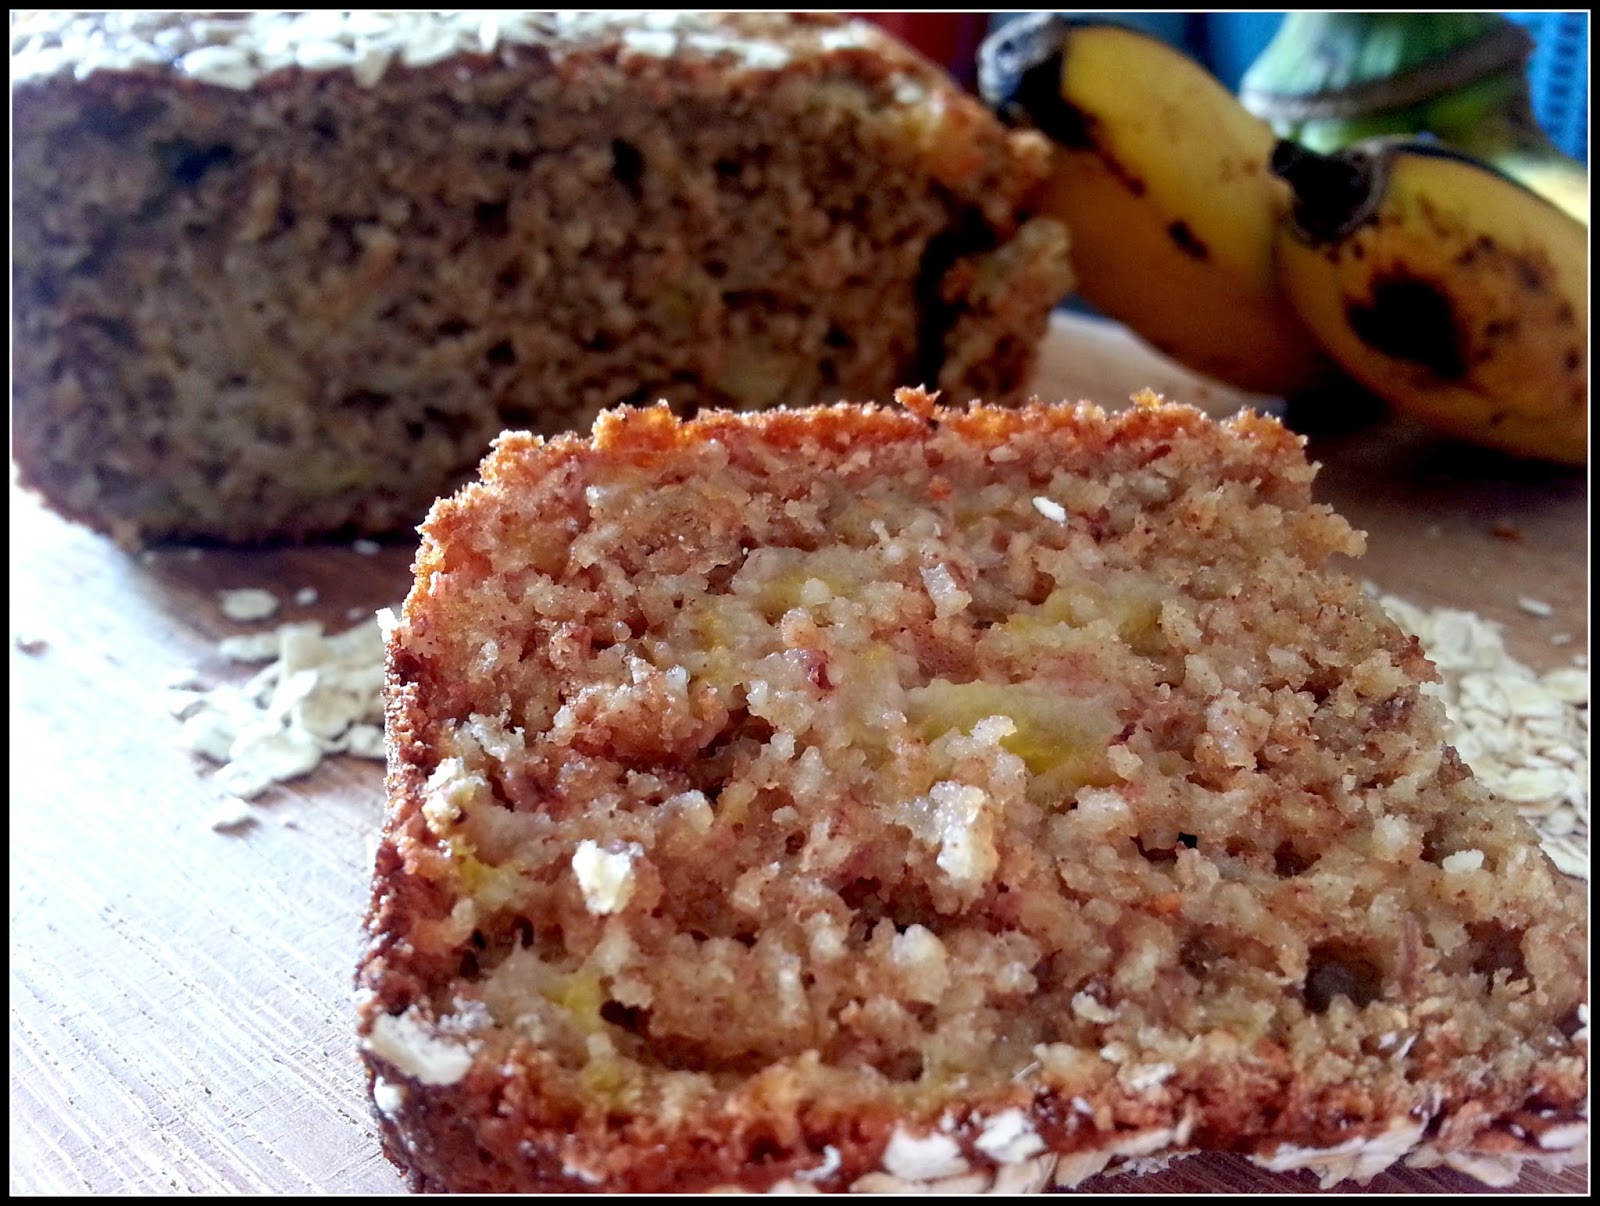
Yea... Banana Bread... I added oat on top to give it a more "healthy" look.. Hahha

You can still see chunks of banana in the bread... 

Saturday, March 15, 2014

Bababa Banana Bread version 1.0

After the holidays. Christmas - New Year - Lunar New Year... Oh My! I have gained quite a bit of weight here and there... wells basically the whole body la.. Sigh.. Have been eating healthier and hitting the gym more often.. On top of that, trying to build more muscles so that I can increase my metabolism rate..

Was a bit bored at home and have not been baking (hence no posts recently)... Work has taken most of my time.. by the time I reach home, I am so exhausted, the last thing on my mind is bring out that flour and bake some thing... It was kind of depressing though.. Not able to do what I like to do... Like my energy is being sucked away. Ok, I digressed a bit.. So... Back to me being bored at home.. I decided to bake something simple to kind of get the engine going... Macarons were out of the questions.. Brought the icing sugar and almond meal out only to put them back in a split second.. Saw some banana.. Ah Ha! Banana Bread then.. But banana and bread.. not very calorie friendly.. Hmm.. I went searching the internet.. looking of how i can make it healthier.. Wow.. a few nice substitutions  out there to replace high calorie ingredients to something more healthy.. I decided to go slow one at a time.. replacing one ingredient with a healthy one each time i baked.. So to experiment and to come out with a more healthy yet incredibly delicious one to recommend.. Am thinking if I should record my whole journey here or just the successful ones.. Wells lets start with version 1.0


Ingredients (make 1 loaf)
  • 1 3/4 Cup of Plain Flour
  • 1 tsp of baking soda
  • 1 tsp of baking powder
  • 1/2 tsp of salt
  • 1/2 tsp of Cinnamon Powder
  • 1/2 Cup of low-fat yoghurt (thinking of trying greek yoghurt the next round)
  • 1 Cup of sugar (thinking of lowing the sugar amount the next round)
  • 2 large eggs
  • 5 medium sized ripe bananas, mashed ("kim-jio" for those living in Singapore)
  • 1 tsp of vanilla extract
  • Zest of 1 orange (medium size)
Directions
  1. Preheat oven to 180C. Set aside a 9" by 5" loaf pan with parchment paper and greased with butter or non-stick spray. 
  2. Mix the 1st 5 dry ingredients together and set aside. 
  3. Add the orange zest into the mashed banana and mixed well.
  4. In a mixing bowl cream the sugar and the yoghurt together for a couple of minutes. Add egg and continue mixing till well combined. 
  5. Add in the banana-orange zest into the mixing bowl. Mix them till well combined. 
  6. Lastly, add in the dry ingredients and stop mixing once 90% of the dry ingredients are combined. Using a spatula, fold to ensure all the dry ingredients are well mixed. This is to prevent over-mixing and the formation of gluten in the flour. If so, the bread will be tough. 
  7. Pour the batter into the loaf pan and bake for 40-45 min or until when you insert a toothpick into the middle of the loaf and the toothpick comes out clean. 
I know.. Don't look that appetizing 


This bread surprisingly baked faster than the normal banana bread recipe.. Usually the bread will take around 1h or more to bake.. I checked it at the 40min mark and it turned out done.

But look how airy the bread is.. not those normal dense banana bread. The air pockets make it very chewy too


Surprisingly, the yoghurt turned out to be quite a good substitute for butter... Now I know.. Got quite a few good compliments from the family and friends.. Even the picky sunshine said it was good.. Moist and the sweetness is just nice... Yea my first experiment was a success!

Wednesday, June 19, 2013

Rosemary Garlic Focaccia - Bread Bread Bread.. My never ending fascination with them

This is just the start of my addictions :)

Bread bread bread.. I have been so fascinated with them… you really get great satisfaction when your bread comes out fresh from the oven. Wells, at least I do… And the smell of the bread fresh from the oven is just so amazing. You would think your house has instantly turned into a bakery. Amazing amazing.. You might have seen my post on sandwich loaf bread. If not, go check it out. The next bread I went to try out is Focaccia. I am always clearing the focaccia in Italian restaurant. You have been to Italian restaurant like Modesto’s, you would have realise that they provide free flow of focaccia FOC!!! (Haha. I’m not that cheapo la.) You must dip your focaccia bread in balsamic vinaigrette. The taste is just fabulous. Carb overload!!!


My fave: Dipping Focaccia bread into Balsamic Vinaigrette

 Apparently focaccia and pizza crust share the same dough. The different with pizza and focaccia is that pizza has the topping covering majority the dough while the dough in focaccia is amply visible. Another major difference is the height of the dough. Focaccia is way thicker than pizza crust.

For this recipe, I made herb oil. Very simple to do.. You just need a few herbs of your choice (fresh or dry also can), garlic, salt and olive oil. Infused the garlic and the herb for a couple of hours and ta-da, your very own herb oil. Good to make focaccia and used it as a dip together with balsamic vinegar.

I made my recipe with fresh rosemary and whole garlic, but there is no stopping your creativity… You can put in caramelized onion, meat and cheese. Basically anything you like.  

For The Ingredients (Feed 8-10 pax)

For the Dough:
  • 475g Bread Flour
  • 11g Salt
  • 4g Instant Yeast
  • 275g Luke Warm Water
  • 1 Tb Herb Oil

For the Topping:
  • 2-3 Sprigs Rosemary (more if you prefer)
  • 6 garlic cloves
  • 2 Tb Herb Oil


Directions
  1. Mixed the dry ingredients (#1-3) well in a large mixing bowl. Add in the lukewarm water into the dry ingredients. Knead gently (I used kitchen aid speed 2) until combine. Add in the herb oil and knead for another 10 minutes until the dough is smooth and not sticky
  2. Spread some oil on a large mixing bowl. Form the dough into a ball and place the dough into the oiled bowl. Spread some oil on the dough to prevent drying of the dough. Cover the mixing bowl with towel or cling wrap for 45 minutes or until double.
  3. Once doubled in size, pour the dough onto an oiled rectangular sheet pan and using your Spread the rosemary, washed garlic (w/ skin) and herb oil. Use your fingers to dimple the toppings into the dough.
  4. Let the dough rest and rise for around 30-40 minutes or until double in size. Preheat the oven to 260oC (or max temp) during this time.
  5. Once the dough is ready to be baked, sprinkle more herb oil on the top of the dough. Baked for 12-14 minutes or until golden brown in colour. 
Yum Yum.. This bread can easily feed 8 pax for starters


Look at the bread.. Don't you just want to bite into the piece.. 

Life is about enjoying good food.. We shall diet tomorrow.. :D

xoxo
Drama Mama


Thursday, June 13, 2013

Wholemeal Sandwich Loaf (汤种 mehod)

It has been so long since I blogged. Too many changes in Drama Mama's life. First I changed job.. Then went to a new company where the laptop is so bulky. Drama Mama is so used to carrying x-series think pad that when she had to carry a T series it is like  boulder to bring home. As such, with no laptop at home, I was not able to blog like I used to.. I no personal laptop.. Multi-functional ma - this is what I call work-life integration.. Anyway, long story cut short, no laptop at home means cannot update my blog... Aiya.. Finally got a laptop now.. :) Can start updating my blog... Wah.. Suddenly I got so many recipe to share with you guys.. Many a times, I happily ate without taking photo.. So smart of me hor..

But nonetheless, I still manage to capture some photos that I can share with all of you :) Let me start with something that I have been trying for many many months ~ plain-o-bread!

Don't know what strike me one day but I decided to make bread. I tried some recipe from allrecipes.com and the bread turned out to be stone! Rock hard stone! It was horrendous.

Can you believe it. I made 2 loaves of hard rock. It did not rise as expected.  OMG!!

Look how short the bread is. 


After that bad experience, I went to search for a method to bake soft bread - those that you can get from Gardenia.. Finally I found this method called Tangzhong (汤种). Basically it is to add in a sponge like starter to your dough. This supposedly made the bread soft and fluffy. Tangzhong is made from cooking 1 part flour with 5 parts water/milk/both till it becomes thick and starchy. I quite like the results, but because I am new with bread making, I am still experimenting with what they call the baker's percentage (wells, that is for another blog altogether on what is baker's percentage.. haha keep you all in suspense.)

Wells here goes the recipe:

For the Tangzhong:

Ingredients (Enough for 1 loaf of bread):

  • 25g of Bread Flour 
  • 125ml of water / water-milk mixture / milk
Directions:

  1. Mix the bread flour into the liquid. Stir till there is no clumps
  2. Pour the mixture into a saucepan and cook under medium heat. Stir constantly from preventing the mixture from being burnt. 
  3. The tangzhong is ready when you see the mixture thicken and you can draw circles and the circles stay on the saucepan. (i.e. the mixture is not fluid enough to flow back) 
  4. Scoop the tangzhong and let it cool till room temperature before you can use to make your bread.

(Makes 1 loaf)

Ingredients:
  • 180g Bread flour
  • 170g Wholemeal flour
  • 6g instant yeast 
  • 5g salt
  • 40g sugar
  • 110g milk
  • 100g tangzhong (1 serving of the tangzhong made earlier)
  • 1 large egg
  • 40g butter, at room temperature
Directions:
  1. Mix the first 5 ingredients together. Whisk the dry ingredients evenly. Set aside
  2. In another mixing bowl, whisk the milk, tangzhong & egg till combine. 
  3. In your stand mixer with dough attachment, combine the dry and wet ingredients together and slowly mix it. (I kept my at level 1-2)
  4. When all the mixture have combine to form a sticky dough, add in the butter and increase the speed of the mixer a level. Let it mixed for about 10 min until the dough is smooth and not sticky. Slightly oil a mixing bowl. Form the dough into a ball shape and place it on the oiled mixing bowl. Add some oil to the surface of your dough to prevent it from drying. Loosely wrap the bowl with cling wrap / wet towel and place it in somewhere warm and draft free. Let the dough proof for 40min or until double it size. 
  5. Once the dough has double in size, punch the dough a few times to get rid of excess carbon dioxide trap in the dough. Cut the dough into 3 equal size and roll them into small balls. Let the dough 'rests' for 15min.
  6. Roll each of the balls into rectangular shape, at the shorter side, roll up the dough (like kitchen roll) and place it into the loaf pan. Continue for the other 2 balls. Let it proof for another 35min or until 90% filled on the loaf pan. In the meantime, preheat the oven to 170C.
  7. Bake the dough for 30-35min or until the bottom sounds hollow. You can add melted butter on the baked bread straight out from the oven for a softer crust. 
YOU HAVE NO IDEA HOW MANY ROUNDS OF BAKING THIS BREAD BEFORE I DARE TO SHOW YOU GUYS!!! I keep making and forcing my family and friends to eat them.. Did not want to waste them, but in the end I still had to throw like a couple batches cos they are just inedible. hahaha..

Finally something decent to show you guys


The bread is so soft, just that it did not rise as much as I would hope it would. 


Look how soft and fluffy the bread is :)
I think I am liking the process of bread making. Most likely this will be the first of many posts on bread ;) hahah..